Category Archives: Fiber Optic Tools & Testers

How To Test Optical Loss with Light Source and Power Meter?

Share

In order to know how effectively your fiber optic cables are transmitting, you’ll need to test each one for optical loss. The term “optical loss” can also be called insertion loss, describes the difference between the amount of light sent into the transmitting end of a fiber optic cable, and the amount of light that successfully makes it to the cable’s receiving end. TIA-standards specify that you must measure optical loss using an optical power meter and the proper optical light source to certify an optical fiber cable. How to do that? This blog will tell you.

Introduction to Optical light source
A light source is a device that provides a continuous wave (CW) and stable source of energy for attenuation measurements. It includes a source, either an LED or laser, that is stabilized using an automatic gain control mechanism. LEDs are typically used for multimode fiber. On the other hand, lasers are used for singlemode fiber applications.

optical light source
The output of light from either an LED or laser source may also have the option of modulation (or chopping) at a given frequency. The power meter can then be set to detect this frequency. This method improves ambient light rejection. In this case, a 2 kHz modulated optical light source can be used with certain types of detectors to tone the fiber for fiber identification or for confirmation of continuity.

Introduction to power meter
The power meter is the standard tester in a typical fiber optic technician’s toolkit. It is an invaluable tool during installation and restoration. The power meter’s main function is to display the incident power on the photodiode.

Introduction to power meter
Transmitted and received optical power is only measured with an optical power meter. Optical loss must be measured with a optical light source. Connect one end of the fiber to the light source and the other end to the power meter. The light source sends a wavelength of light down the fiber. At the other end of the cable, the power meter reads that light, and determines the amount of signal loss.

Introduction to Testing Procedure

  • Connect the optical light source to the transmitting end of the test cable.
  • Connect the power meter to the receiving end of the test cable.
  • Turn on the source and select the wavelength you want for the loss test.
  • Turn on the meter, select the “dBm” or “dB” range and select the wavelength you want for the loss test.
  • Measure the power and loss at the meter.

Light Source and Power Meter

Cables with losses higher than 0.5 dB per end should be cleaned and retested. Dirt is always an issue. If any of the connectors are dirty, measurements will show higher loss and more variability. If the optical loss is still higher than 0.5 dB after cleaning, that means this cable is unqualified. Then you can discard it.

Related Article:

How to Test a Fiber Optic Transceiver?

Optical Power Meter (OPM): A Must for Fiber Cable Testing

A Good Fiber Optic Cleaver Helps Cut Out Costly Mistakes

Share

To get good fiber optic splices or terminations, especially when using the pre-polished connectors with internal splices, it is extremely important to cleave the fiber properly. If the fiber ends are not precisely cleaved, the ends will not mate properly. To prepare a fiber end for a connector or splice, the end of the fiber must be cleaved to a 90 degree flat end. For technicians the problem is that the end of the fiber strand is so small that it is impossible to tell with the naked eye whether the strand has a flat end. So in order for this to happen, you must use a cleaving tool called fiber optic cleaver. Some knowledge of fiber optic cleaves will be provided in this article.

good and bad fiber cleave

What Is Fiber Optic Cleaver?
A cleave in an optical fiber is a deliberate, controlled break, intended to create a perfectly flat end face, perpendicular to the longitudinal axis of the fiber. A fiber optic cleaver is a tool that holds the fiber under low tension, scores the surface at the proper location, then applies greater tension until the fiber breaks. Usually, after the fiber has been scored, the technician will use a cleaver either bend or pull the fiber end, stressing the fiber. This stress will cause the fiber to break at the score mark, leaving a 90 degree flat end if all goes well. So the cleaver doesn’t cut the fiber. In fact, it just breaks the fiber at a specific length.

Two Types of Fiber Optic Cleavers
We know that the closer to 90 degrees the cleave is, the more success you will have with matching it to another cleaved fiber to be spliced or mated by a connector. So it’s important to use the proper tool with good technique to consistently achieve a 90 degree flat end. Good cleavers are automatic and produce consistent results, irrespective of the operator. The user need only clamp the fiber into the cleaver and operate its controls. Some cleavers are less automated, making them more dependent on operator technique and therefore less predictable. There are two broad categories of fiber optic cleavers, scribe cleavers and precision cleavers.

Scribe Cleavers
A traditional cleaving method, typically used to remove excess fiber from the end of a connector before polishing, uses a simple hand tool called a scribe. Scribe cleavers are usually shaped like ballpoint pens with diamond tipped wedges or come in the form of tile squares. The scribe has a hard, sharp tip, generally carbide or diamond, that is used to scratch the fiber manually. Then the operator pulls the fiber to break it. Since both the scribing and breaking process are under manual control, this method varies greatly in repeatability. Most field and lab technicians shy away from these cleavers as they are not accurate. However, if in skilled hands, this scribe cleaver offer significantly less investment for repairs, installation, and training classes.

Scribe

Precision Cleavers
Precision cleavers are the most commonly used cleavers in the industry. They use a diamond or tungsten wheel/blade to provide the nick in the fiber. Tension is then applied to the fiber to create the cleaved end face. The advantage to these cleavers is that they can produce repeatable results through thousands of cleaves by simply just rotating the wheel/blade accordingly. Although more costly than scribe cleavers, precision cleavers can cut multiple fibers while increasing speed, efficiency, and accuracy. In the past, many cleavers were scribes, but over time, as fusion splicers became available and a good cleave is the key to low splice loss, precision cleavers were developed to support various applications and multiple fiber cleaving with blades that have a much longer life span.

Precision Cleaver

Which One to Use: Scribe Cleaver or Precision Cleaver?
While both types perform the functions above, the difference between the two categories of cleavers is the percentage yield of good cleaves. An experienced fiber optic technician will achieve approximately 90% good cleaves with a scribe cleaver, while the precision cleaver will produce 99% good cleaves. The difference doesn’t seem like much so you may hardly to make a specific decision. My suggestion is to buy precision cleavers if you plan to use a lot of mechanical splices or pre-polished splice/connectors. It will pay for itself in no time. If you decide to use the inexpensive scribe cleavers, you must learn how to use it properly. Follow directions, but also do what comes naturally to you when using the device, as they are sensitive to individual technique. Inspect the fibers you cleave to see how good they are and keep practicing until you can make consistently good cleaves.

To find pricing, information and more information on the different fiber optic cleavers currently available, please visit www.fs.com. Sign up to get informative news, posts and deals in regards to current products in the fiber optic field. Or you also can contact our friendly staff members at sales@fs.com to learn more about all the fiber optic cleavers with the best value that are present in the industry today.

Original article source:
http://www.fs.com/blog/a-good-fiber-optic-cleaver-helps-cut-out-costly-mistakes.html

The Era of Fusion Splicing Is Coming

Share

Fusion splicingAs fiber deployment has become mainstream, splicing has naturally crossed from the outside plant (OSP) world into the enterprise and even the data center environment. Fusion splicing involves the use of localized heat to melt together or fuse the ends of two optical fibers. The preparation process involves removing the protective coating from each fiber, precise cleaving, and inspection of the fiber end-faces. Fusion splicing has been around for several decades, and it’s a trusted method for permanently fusing together the ends of two optical fibers to realize a specific length or to repair a broken fiber link. However, due to the high costs of fusion splicers, it has not been actively used by many people. But these years some improvements in optical technology have been changing this status. Besides, the continued demand for increased bandwidth also spread the application of fusion splicing.

New Price of Fusion Splicers
Fusion splicers costs have been one of the biggest obstacles to a broad adoption of fusion splicing. In recent years, significant decreases in splicer prices has accelerated the popularity of fusion splicing. Today’s fusion splicers range in cost from $7,000 to $40,000. The highest-priced units are designed for specialty optical fibers, such as polarization-maintaining fibers used in the production of high-end non-electrical sensors. The lower-end fusion splicers, in the $7,000 to $10,000 range, are primarily single-fiber fixed V-groove type devices. The popular core alignment splicers range between $17,000 and $19,000, well below the $30,000 price of 20 years ago. The prices have dropped dramatically due to more efficient manufacturing, and volume is up because fiber is no longer a voodoo science and more people are working in that arena. Recently, more and more fiber being deployed closer to the customer premise with higher splice-loss budgets, which results in a greater participation of customers who are purchasing lower-end splicers to accomplish their jobs.

More Cost-effective Cable Solutions
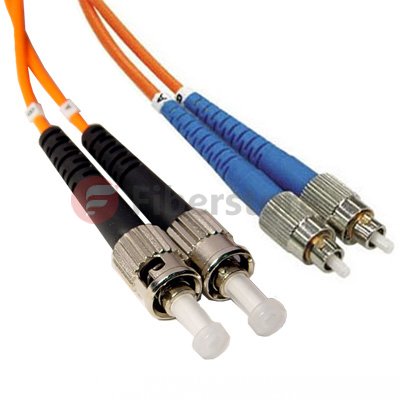
The first and primary use of splicing in the telecommunications industry is to link fibers together in underground or aerial outside-plant fiber installations. It used to be very common to do fusion splicing at the building entrance to transition from outdoor-rated to indoor-rated cable, because the NEC (National Electrical Code) specifies that outdoor-rated cable can only come 50 feet into a building due to its flame rating. The advent of plenum-rated indoor/outdoor cable has driven that transition splicing to a minimum. But that’s not to say that fusion splicing in the premise isn’t going on.

Longer distances in the outside plant could mean that sticking with standard outdoor-rated cable and fusion splicing at the building entrance could be the more economical choice. If it’s a short run between building A and B, it makes sense to use newer indoor/outdoor cable and come right into the crossconnect. However, because indoor/outdoor cables are generally more expensive, if it’s a longer run with lower fiber counts between buildings, it could ultimately be cheaper to buy outdoor-rated cable and fusion splice to transition to indoor-rated cable, even with the additional cost of splice materials and housing.

As fiber to the home (FTTH) applications continue to grow around the globe, it is another situation that may call for fusion splicing. If you want to achieve longer distance in a FTTH application, you have to either fusion splice or do an interconnect. However, an interconnect can introduce 0.75dB of loss while the fusion splice is typically less than 0.02dB. Therefore, the easiest way to minimize the amount of loss on a FTTH circuit is to bring the individual fibers from each workstation back to the closet and then splice to a higher-fiber-count cable. This approach also enables centralizing electronics for more efficient port utilization. In FTTH applications, fusion splicing is now being used to install connectors for customer drop cables using new splice-on connector technology and drop cable fusion splicer.

FTTH drop cable fusion splicer

A Popular Option for Data Centers
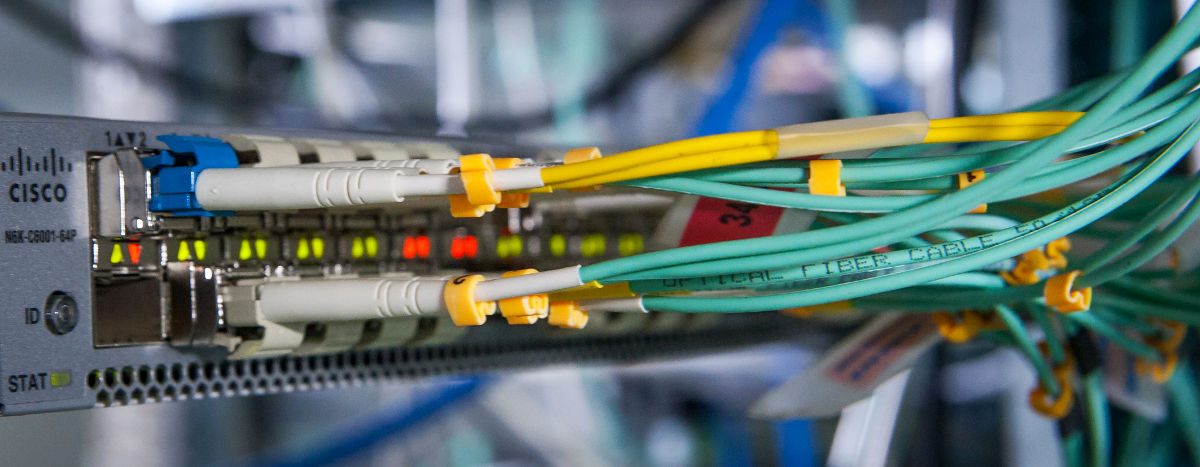
A significant increase in the number of applications supported by data centers has resulted in more cables and connections than ever, making available space a foremost concern. As a result, higher-density solutions like MTP/MPO connectors and multi-fiber cables that take up less pathway space than running individual duplex cables become more popular.

Since few manufacturers offer field-installable MTP/MPO connectors, many data center managers are selecting either multi-fiber trunk cables with MTP/MPOs factory-terminated on each end, or fusion splicing to pre-terminated MTP/MPO or multi-fiber LC pigtails. When you select trunk cables with connectors on each end, data center managers often specify lengths a little bit longer because they can’t always predict exact distances between equipment and they don’t want to be short. However, they then have to deal with excess slack. When there are thousands of connections, that slack can create a lot of congestion and limit proper air flow and cooling. One alternative is to purchase a multi-fiber pigtail and then splice to a multi-fiber cable.

Inside the data center and in the enterprise LAN, 12-fiber MPO connectors provide a convenient method to support higher 40G and 100G bandwidth. Instead of fusing one fiber at a time, another type of fusion splicing which is called ribbon/mass fusion splicing is used. Ribbon/mass fusion splicing can fuse up to all 12 fibers in one ribbon at once, which offers the opportunity to significantly reduce termination labor by up to 75% with only a modest increase in tooling cost. Many of today’s cables with high fiber count involve subunits of 12 fibers each that can be quickly ribbonized. Splicing those fibers individually is very time consuming, however, ribbon/mass fusion splicers splice entire ribbons simultaneously. Ribbon/mass fusion splicer technology has been around for decades and now is available in handheld models.

Ribbon/Mass Fusion Splicer

Conclusion
Fusion splicing provides permanent low-loss connections that are performed quickly and easily, which are definite advantages over competing technologies. In addition, current fusion splicers are designed to provide enhanced features and high-quality performance, and be very affordable at the same time. Fiberstore provides various types and uses of fusion splicers with high quality and low price. For more information, please feel free to contact us at sales@fs.com.

The Introduction of Optical Power Meter

Share

What Is an Optical Power Meter?
optical power meter
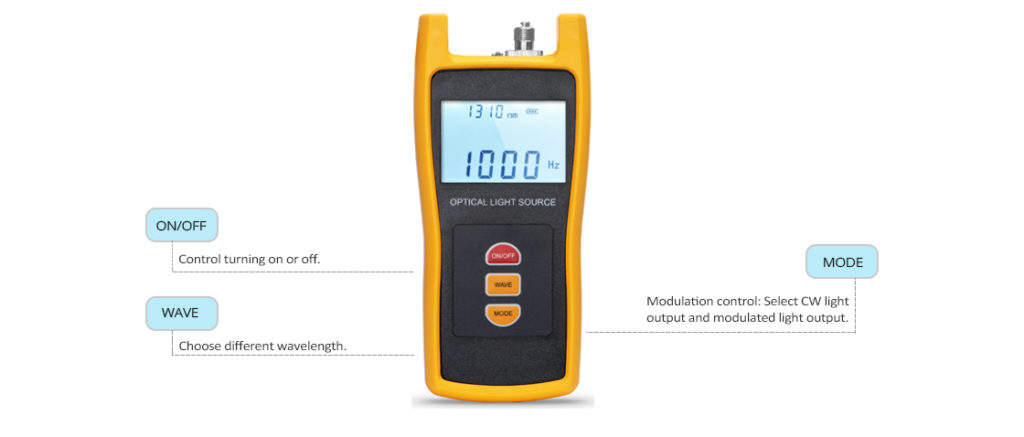
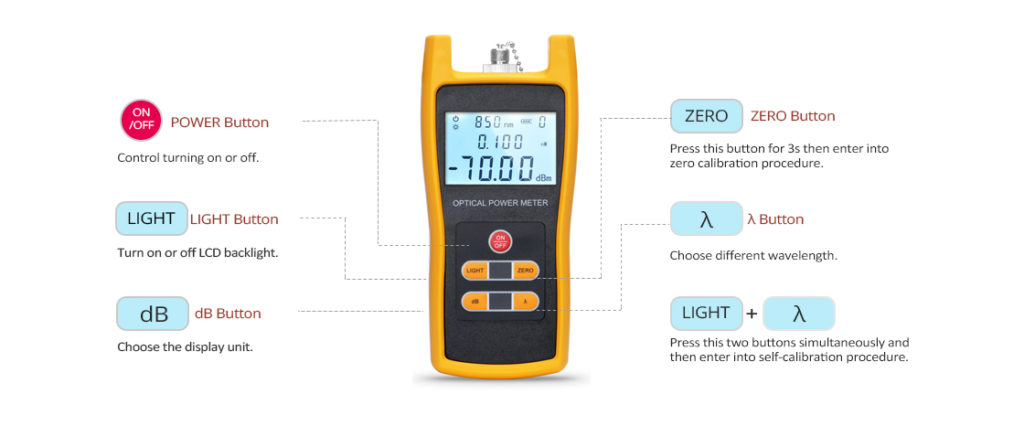
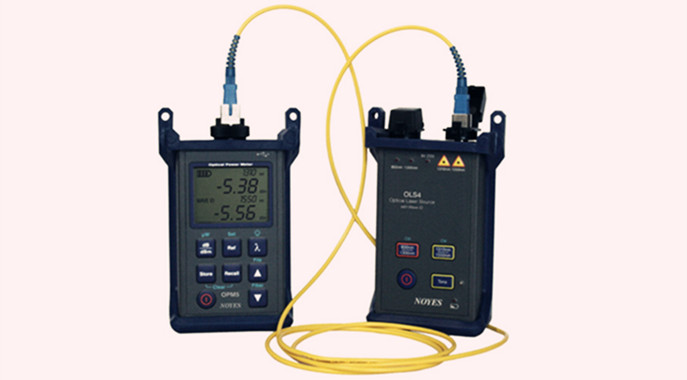
An Optical Power Meter usually knows as Fiber optical power meter is a device that used to measure the absolute optical signal and relate fiber optic loss. The term usually refers to a device for testing average power in fiber optic systems. Fiber optical power meter is a tool for telecommunication and CATV network. Optical power meter consists of a calibrated sensor, measuring amplifier and display. The sensor primarily consists of a photodiode selected for the appropriate range of wavelengths and power levels. On the display unit, the measured optical power and set the wavelength are displayed. Power meters are calibrated using a traceable calibration standard such as a NIST standard.

When to Use Optical Power Meter?
When you install and terminate fiber optic cables, you need to test them. A test should be conducted for each fiber optic cable plant for three main areas: continuity, loss, and power. In order to do this, you’ll need a fiber optic power meter.

How to Use Optical Power Meter?
When you measure fiber optic power with a power meter, you should attach the meter to the cable. Turn on the source of power, and view the meter’s measurement. Compare the meter measurement with the specified correct power for that particular system to make sure it have proper power not too much or too little . Correct power measurement is so important to fiber optic cables because the system works similar to electric circuit voltage, and the power must be just the right amount to work properly.

Classification of Optical Power Meter
There are two types of Optical Power Meter: Ordinary Optical Power Meter and PON Optical Power Meter. Ordinary optical power meter measures the optical power in the fiber link, typically an absolute power value 850/1300/1310/1490/1550/1625nm optical wavelength. While PON Optical Power Meter is more suitable for measuring the fiber to the home (FTTH) networks. Specific measurement: PON Optical Power Meter can send three wavelengths from a single laser output port (1310 nm, 1490 nm, 1550 nm), of which 1310nm can measure upstream transmission direction, 1490 nm and 1550 nm measure downstream direction. Upstream associated with your upload data, downward is download data.

Tips for Selection and Operation

  • Choose the best probe type and interface type.
  • Evaluation of calibration accuracy and manufacturing calibration procedures, and your fiber and connectors to match the required range.
  • Make sure the type and the range of your measurement and display resolution is consistent.
  • With immediate effect db insertion loss measurements.
  • Wear eye protection when working with high-power cables. Even with low-power layouts, it’s wise to check the connectors with your power meter before looking.

Patch Cord Optical Power Loss Measurement

Share

Measurement of fiber optic cable loss is an established practice that has been performed for many years. However, over time, the performance of fiber optic equipment has been improved, so occasionally it is useful to perform a practical re-assessment of the accuracy of these measurements.

Multi-mode patch cord optical loss power measurement is performed using the steps described in ANSI/TIA-526-14, method A. The fiber optic patch cord is substituted for the cable plant. Because patch cords are typically no longer than 5 m, the loss for the optical fiber is negligible and testing can be performed at 850 nm or 1300 nm. The loss measured in this test is the loss for the patch cords connector pair. ANSI/TIA-568-C.3 states that the maximum loss for a connector pair is 0.75 dB.

After setting up the test equipment as described in ANSI/TIA-526-14, method A, clean and inspect the connectors at the ends of the patch cords to be tested. Verity that your test jumpers have the same optical fiber type and connectors as the patch cords you are going to test. The transmit jumper should have a mandrel wrap or modal conditioner depending on the revision ANSI/TIA-526-14 being used for testing. Ensure that there are no sharp bends in the test jumpers or patch cord during testing.

Because both patch cord connectors are easily accessible, optical power loss should be measured in both directions. The loss for the patch cord is the average of the two measurements. If the loww for the patch cord exceeds 0.75dB in either direction, the patch cord needs to be repaired or replaced.

For testing the loss of a patchcord, you only need an 850 nm LED light source for multimode cable or 1310 laser for singlemode, a fiber optic power meter and some reference patchcords. Just remember that the patchcords used for references in testing must be good for tests to be valid, so you test them as you would other patchcords, just more often.

Testing patch cords is similar to testing any fiber optic cable. Use one reference patch cord to set a 0 dB reference. Connect a patch cord to test to the reference patch cord with a mating adapter. Connect the power meter to the other end of the patch cord and measure the loss. Since the length of the fiber is short, the loss contribution of the fiber is ignoble. And since one end of the cable is attached to the power meter, not another cable, you only measure the loss of the one connection between the reference cable and the cable under test, so you can test each connector individually.

To complete the testing of the patch cord, reverse the cable you are testing to check the connector on the other end. Sometimes you will find one bad connector and can replace it to make the patch cord useful again. But often the cost of replacing the connector may be higher than replacing the patch cord itself.

If your test equipment has different connectors than the patchcords you are testing, you will need hybrid reference cables with connectors compatible with the equipment on one end and the patchcord connectors on the other end. You will also need the correct connector adapters for your power meter.

Obviously, all reference cables used for testing must have high quality connectors to get reliable test results. Use this same method to test your reference cables against each other and discard any with high losses, usually those with losses over 0.5 dB.

Fiber Patch Cord Power Loss Measurement

Share

Multi-mode patch cord optical loss power measurement is performed using the steps described in ANSI/TIA-526-14,method A. The patch cord is substituted for the cable plant. Because patch cords are typically no longer than 5 m, the loss for the optical fiber is negligible and testing can be performed at 850 nm or 1300 nm. The loss measured in this test is the loss for the patch cord connector pair. ANSI/TIA-568-C.3 states that the maximum loss for a connector pair is 0.75 db.

After setting up the test equipment as described in ANSI/TIA-526-14, method A, clean and inspect the connectors at the ends of the fiber patch cord to be tested. Verify that your test jumpers have the same optical fiber type and connectors as the patch cords you are going to test. The ANSI/TIA-526-14 being used for testing. Ensure that there are no sharp bends in the test jumpers or patch cords during testing.

Because both patch cord connectors are easily accessible, optical power loss should be measured in both directions. The loss for the patch cord is the average of the two measurements. If the loss for the patch cord exceeds 0.75dB in either direction, the patch cord needs to be repaired or replaced.

Connector insertion loss measurement isolates the loss of a single connector on a cable assembly. It may be referred to as connector loss. Many time cable assemblies are shipped from the manufacturer with the insertion loss for each connector listed on the packaging. The package shown in Figure 33.37 contains a duplex multi-mode patch cord. In the upper-left corner of the package, a label lists the insertion loss measurements for each connector.

Connector test jumper 1 as shown earlier in Figure 33.31. Record the optical power displayed by the optical power meter. This number is the reference power measurement. This number is typically around -20dBm with a 62.5/125μm multimode optical fiber and -23.5dBm with a 50/125μm multimode optical fiber. These numbers can vary from OLTS to OLTS. The following are 62.5/125μm and 50/125μm multimode fiber from fiberstore, picture is below:

SC-SC Multi mode

SC-SC Plenum Duplex 62.5/125 Multi-mode Fiber Patch Cable, with SC to SC termination, this fiber optic patch cable is specificially designed for ethernet, multimedia, or communication applications. The SC connector features a push-pull locking system. The plenum rating provides the fire protection required to run this cable within walls and air plenums without using conduit. The patented injection molding process provides each connection greater durability in resisting pulls, strains and impacts from cabling installs.

FC-ST

ST Fiber Cable connector has a bayonet-style housing and a long spring-loaded ferrule hold the fiber. They are available in both multi-mode or single mode versions. Horizontally mounted simplex and duplex adapters are available with metal or plastic housing.

Fiber Optic Visual Light Testers from FiberStore

Share

Visual fault locators can be part of OTDR, which is able to locate the breakpoint, bending or cracking of the fiber glass. It can also locate the fault of OTDR dead zone and make fiber identification from one end to the other end. Fiber optic visual fault locators include the pen type, the handheld type and portable visual fault locator. FiberStore also supply a new kind of fiber optic laser tester that can locates fault up to 30km in fiber optic cable.

The new visual fault locator fiber optic laser tester 30km is especially designed for field personnel who need an efficient and economical tool for fiber tracking, fiber routing and continuity checking in an optical network during and after installation. It can send fiber testing red light through fiber optic cables, then the breaks or faults in the fiber will refract the light, creating a bright glow around the faulty area. Its pen shape made it very easy to carry, and its Cu-alloy material shell made it sturdy and durable, 2.5nm universal interface make it more attractive. The inspection distance various according to different mode.

Features
Easy to check fiber faults with visual red laser light
FC, SC, ST General interface
Sturdy and durable shell
Constant output power
Long inspection distance
Operates in either CW (Continuous wave) or pulse (Both modes are available)
Pen pattern design, convenient for use and carry
Dust-proof design keeps fiber connectors clean

Compact in size, light in weight, red laser output, both SM and MM available

FiberStore provides enough stock of fiber optic visual light testers which usually be shipped out in a short time, and can be shipped out in 2-4 business days. We offer 1 years warranty for the quality of these products, so customers can place the order with 100% confidence!

Overview of Miller Fiber Optic Stripper

Share

Miller is a diversified global company specialized in high-tech products in development. It’s diverse business involves in welding, cable & wire tools, winery, furniture and even textile. Miller Cable & wireless tools are very famous fiber optic tools that feature top technology and perfect performance.

FiberStore, as the major global fiber optic tools provider, is proud to become the agent for the original Miller fiber optic tools. Our Miller fiber optic tools include fiber scribers, cable Strippers, cutting tools and Kevlar shears.

A precise stripper is utilized to remove the buffer coating of the fiber itself for termination. There are three types of fiber strippers available, known as the Miller Stripper, No-Nik and Micro-Strip. These three can work equally well, and most techs choose the one they are most acquainted with. The Miller striper is used on the left thus has the disadvantage of being “right-handed”, Which is considered to be the most rugged. The No-Nik is careful with the fiber but requires careful cleaning. Check out the original Miller Fiber optic stripper features:

Miller Fiber Optic Stripper FO 103-D-250
New Dual holes models offer he same quality of our standard FO 103-S fiber tool coupled with a second hole
FO 103-D-250: Second hole for stripping 900 micron tight buffer down to 250 micron buffer coating and standard 125 micron fiber stripping (250 micron removal to 125 micron) – allows longer
Stripping lengths without damaging the fiber
Easy-to-read stripping diagrams imprinted on handles
Made in the U.S.A.
Length: 5.375 in (137mm)
Weight: 2.5 oz (71g)

Miller Fiber Optic Stripper FO 103-T-250-J
New three-hole model performs all common fiber stripping functions in one compact tool….
Hole for removal of 2 to 3 mm fiber jackets
Remove 900 tight buffer to 250 micron buffer coating
Standard 250 to 125 micron stripping
Same consistent quality and features found in our standard FO 103-S tool
Made in the U.S.A.
Length: 5.375 in (137mm)
Weight: 2.5 oz (71g)

Miller FO 103-S Fiber Optic Stripper
For stripping 250 micron buffer coating from 125 micron optical fiber
Precision diameter hole & V-opening in blade allow for accurate buffer coating removal
NEW pivot pin, spring and precision handles enhances tool functionality and durability
Factory set, requires no adjustment
Prevents scratching or nicking of optical fiber
All cutting surfaces are precision formed, hardened, tempered and ground assuring precise buffer removal
Made in the U.S.A.
Length: 5.375 in (136.53mm)
Weight: 2.5 oz (71g)

Miller Fiber Optic Stripper CFS-2
For stripping 250 micron buffer coating to expose 125 micron cladding fiber
Second hole for stripping 2-3mm fiber jackets
140 µm diameter hole and V-opening in blade allows removal of 250 micron buffer coating from 125 micron fiber
Pre-set at the factory – no adjustments needed
Will not scratch or nick glass fiber
All stripping surfaces are manufactured to precise tolerances to assure clean, smooth strips
Comfort-grip, ergonomic handles
Lock to hold tool closed when it is not in use
Length 6.43 in (165.00mm)
Weight 4.17 ounces (119.0g)

Most strippers are “sized” for the fiber coatings to be removed. So ensure you have the proper stripper for the fiber being stripped. Whichever stripper is used. Care must be taken to not nick the Fiber during the stripping process as it can cause cracks that may lead to fiber failure sometime in the future. Strippers require careful cleaning and immediate replacement if they become damaged or worn.

Strippers are sized for the fiber coatings to be removed. So ensure you have the proper stripper for the fibers to be stripped. Whichever stripper is used, you must take care to not nick the fiber during the stripping process as it can cause cracks that may lead to fiber failure sometime in the future. fs.com supplies various of high quality fiber optic tools individually or in kits, most of the price is extremely cheap, even the fiber optic tool kit price is with attractive discount rate.

Find Hidden Cables with Cable Wire Locators

Share

Locating buried and hidden lines prior to construction or maintenance projects is critical to ensure the safety of your crew and reducing the potentially costly mistake. Cable locators and wire tracers are specially designed to aid in locating energized and de-energized wires, cable and pipes whether underground or hidden in a wall.

Cable locators are reply on the target having a charge or signal placed on them which is detected by a receiver within the locator, many locators are able to induce a signal onto the line using a transmitter in order to find it. Generally, the target must be metallic in order to conduct the signal, through a sonder or mini-transmitter can be used with plastic pipes. When induce a signal onto a pipe or cable, the transmitter is most commonly connected directly to the line or pipe to be located using signal clamps or clips. The signal will then transmit along the pipe or cable. In areas where there is no access to the line, the transmitter can also induce a signal from above, through the gourd to reach the utility.

Depending upon the application, there is a range of cable locators to be chosen. Some are designed for use for underground lines and pipes while other better suited for the tight confines of a walllikes wire trackers. Cable locators usually include a transmitter and a receiver. A widely used underground cable wire locator is NF-816, which is designed to locate the path of none-energized wirebehind walls or underearth. It can rapidly find the target wire from among plenty of telephone wires or network wires. By comparing the volume of the “tout” sound and the brightness of the signal indicator, you can find the target wire which has the highest volume and brightest indicator.

There are two primary methods of sweeping for lines and pipes with a cable locator: Passive locating involves sweeping an area looking for unknown lines while actively locating searching for a specific line by using either a direct connection or by inducing a signal. When using a cable locator to find underground lines and pipes, the underearth condition has a significant impact on the signal. Lays and camp solids help the signals travel down the line or pipe stronger with less interference than dry soils. So it is necessary to add water to the ground near the transmitter to improve signal strength.

Using Fiber Optic Power Meter to Test Optic Power Level

Share

Fiber optic communication equipment is based on the optical power level between the transmitter and the receiver. The difference of the optical power level between them is the loss of the cabling plant. To measure the power loss of them, an optical power meter is needed to conduct a power loss testing.

fiber optic power meter is typically consist of a solid state detector, signal conditioning circuitry and a digital display of power. To interface to the large variety of fiber optic connectors in use, some form of removable connector adapter is usually provided. The power meter is calibrated at the same wavelength at the source output such as multimode 850 or 1300nm, single mode, 1310, 1490 and/or 1550nm, POF. Meters for POF systems are usually calibrated at 650 and 850nm. The wavelengths used in POF systems.

When performing the test, use the optical power meter adapter to mate to the connector type on the cable. The connectorized reference patch cables must be the same fiber type and size as the cable plant and have connectors compatible to those on the source and cables.

Power meters are calibrated to read in dB reference to one milliwatt of optical power. Some meters of a relative dB scale also, useful for loss measurements since the reference value may be set to 0 dB on the output of the test source. Occasionally, lab meters may also measure in linear units like milliwatts, microwatts and nanowatts.

Optical Power Testing Procedure:
Turn on the power meter to allow time to warm-up.
Set meter to wavelength of the source and “dBm” to measure calibrated optical power.
Clean all connectors and mating adapters.
Attach reference cable or fiber patch cord to source if testing source power or disconnect cable from receiver.
Attach power meter to end of cable and read measured power.

To reduce the measurement uncertainty, you must calibrate the optical power meter according the manufacturers specified intervals. Clean all connectors and remove the meter adapter periodically to clean the adapters and power meter detector. To avoid the stress loss, please don’t bend the fiber optic cables during the testing.

Optic power testing is only one the main part of fiber optic testing. Most test procedures for fiber optic component specifications have been standardized by national and international standards which are converted in procedures for measuring absolute optical power, cable and connector loss and the effects of many environment factors such as temperature, pressure, flexing, etc. Basice fiber optic testing instruments are the fiber optic power meter, optical light source, OTDR and fiber inspection microscope.