Tag Archives: 40G transceiver

Differences Between 40G QSFP LRL4 and PLRL4 Modules

Share

Data centers regularly undertake their own great migration, to ever-higher-speed networks. Since IEEE 802.3ba Ethernet standard introduced the 40 Gigabit Ethernet in 2010, 40G has been an unstoppable tendency in the future. At present, QSFP, CXP and CFP are three 40G transceiver module options. Among QSFP is the most common one. In terms of 40G QSFP modules, there are many different types available, such as QSFP-40G-CSR4, QSFP-40G-LR4, QSFP-40G-SR4, QSFP-40G-LRL4 and QSFP-40G-PLRL4 etc. We can see that QSFP-40G-LRL4 and QSFP-40G-PLRL4 look like similar. One difference is QSFP-40G-PLRL4 has a word “P”. So, what does this word mean? This passage will explain it and tell you some other differences between them.

In fact, QSFP PLRL4 refers to QSFP parallel LRL4. In general, digital data transmission can occur in two basic modes: serial or parallel. In parallel transmission, multiple bits are sent simultaneously on different channels within the same cable, or radio path, and synchronized to a clock. However, in serial transmission, bits are sent sequentially on the same channel which reduces costs for wire but also slows the speed of transmission. So 40G QSFP PLRL4 module uses parallel transmission which is achieved with MPO/MTP multifiber connectors. 40G QSFP LRL4 module uses serial transmission of which the connector is LC.

QSFP-40G-LRL4 QSFP-40G-PLRL4

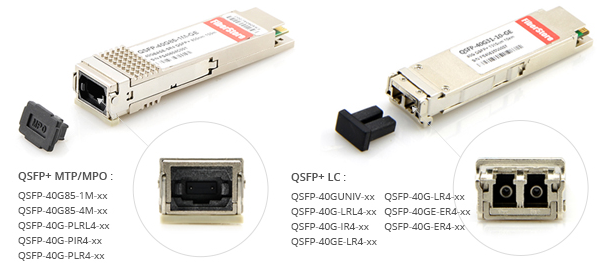
For these two modules both operate on 40GBASE-LRL4 standard, they actually both support link lengths of up to 1 kilometers over a standard pair of G.652 single-mode fiber. But besides the optical connectors they used, the wavelength and the interoperability of them are also different.

Wavelength (nm)

  • 40GBASE-LRL4 QSFP (Multiplexing and demultiplexing of the four wavelengths): 1270 nm, 1290 nm, 1310 nm, 1330 nm
  • 40GBASE-PLRL4 QSFP: 4 x 1310nm

Interoperability

  • For 40GBASE-LRL4 QSFP, the 40 Gigabit Ethernet signal is carried over four wavelengths. Multiplexing and demultiplexing of the four wavelengths are managed within the device.
  • For 40GBASE-PLRL4 QSFP, the 4x10G connectivity is achieved using an external 12-fiber parallel to 2-fiber duplex breakout cable, which connects the 40GBASE-LR4 module to four 10GBASE-LR optical interfaces. QSFP-40G-PLRL4 is optimized to guarantee interoperability with any IEEE 40GBase-LR4 and 10GBase-LR (in 4x10G mode).

All the comparisons between 40G QSFP LRL4 and PLRL4 modules above are listed in the following table. From this chart, you may get a more intuitive understanding.

Name Distance Wavelength Connector Interoperability
QSFP-40G-LRL4 1km (G.652) 1270nm, 1290nm, 1310nm, 1330nm LC 4-Channel CWDM Mux/Demux inside with SFP+ CWDM
QSFP-40G-PLRL4 1km (G.652) 4 x 1310nm MPO/MTP 4 x 10G operations on SMF with SFP+ LR

After reading this passage, you may know more about these two kinds of QSFP modules. Each one of them has their own features, which can satisfy different applications. You should choose the most suitable module for your use. fs.com has a large number of QSFP-40G-PLR4 and QSFP-40G-PLRL4 modules in stock with super quality and competitive price. You can visit that website to  choose your optics.

Related Article: 40G Transceiver Module: QSFP+ Module And CFP Module

How to Install a 40G QSFP+ Transceiver

Share

1The 40G QSFP+ transceiver module is a hot-swappable, parallel fiber-optical module which has four independent optical transmit and receive channels. These channels can terminate in another 40G QSFP+ transceiver and can also be divided out to four separate 10G SFP+ transceivers. The QSFP+ transceiver module can operate on both copper and optical fiber cables. For example, QSFP-40G-SR4 module supports link lengths of 100m on OM3 multimode optical fiber and 150m on OM4 multimode optical fiber. Now, this 40G QSFP+ transceiver is mainly used in short reach applications in switches, routers, and data center equipment. As it provides higher density than 10G SFP+ transceivers, people are more likely to use this effective transceiver in these few years. But do you really know how to install a 40G QSFP+ transceiver? This article may offer you some specific guidances.

In general, there are 8 steps to install a 40G QSFP+ transceiver. As we all know, the QSFP+ transceiver module is a static-sensitive device. So, we always use an ESD wrist strap or similar individual grounding device when handling QSFP+ transceiver modules or coming into contact with system modules. Besides, the QSFP+ transceiver module can have either a bail-clasp latch or a pull-tab latch. In this text, installation procedures for both types of latches are offered. These 8 steps are as following:

Step 1: Attach an ESD wrist strap to yourself and a properly grounded point on the chassis or the rack.
Step 2: Remove the QSFP+ transceiver module from its protective packaging.
Step 3: Check the label on the QSFP+ transceiver module body to verify that you have the correct model for your network.
Step 4: For optical QSFP+ transceivers, remove the optical bore dust plug and set it aside.
Step 5: For transceivers equipped with a bail-clasp latch:
a. Keep the bail-clasp aligned in a vertical position.
b. Align the QSFP+ transceiver in front of the module’s transceiver socket opening and carefully slide the QSFP+ transceiver into the socket until the transceiver makes contact with the socket electrical connector. (Just do as the following picture shows.)

2
Step 6: For QSFP+ transceivers equipped with a pull-tab:
a. Hold the transceiver so that the identifier label is on the top.
b. Align the QSFP+ transceiver in front of the module’s transceiver socket opening and carefully slide the QSFP+ transceiver into the socket until the transceiver makes contact with the socket electrical connector.
Step 7: Press firmly on the front of the QSFP+ transceiver with your thumb to fully seat the transceiver in the module’s transceiver socket. (Just do as the following picture shows.)

3
Step 8: For optical QSFP+ modules, reinstall the dust plug into the QSFP+ transceivers optical bore until you are ready to attach the network interface cable. Do not remove the dust plug until you are ready to attach the network interface cable.

After reading this text, I hope you can get a clear understanding of how to install a 40G QSFP+ transceiver. If you want to know more about this 40G transceiver, you can visit Fiberstore which provides many tutorials about all kinds of fiber optic transceivers. And if you want to buy QSFP+ transceiver, I also recommend you to visit Fiberstore. The fiber optic transceivers they offered are always at low price and high quality.

Related Article: Optical Module Maintenance Methods and Installation Tips

Related Article: FS 40G QSFP+ Modules And DAC/AOC Cables Installation Guide