
Security is paramount both in life and business, hence an increasing number of people are protecting their homes and business with surveillance systems mounted around their property. NVR (Network Video Recorder) serves as the nerve of sophisticated security – it provides constant coverage of your property and allows you to view in real time with crystal-clear, high-resolution imagery. Then how to set up a NVR with your network devices to reap the great benefit it brings? We will illustrate common NVR Setup with a PoE switch.
An NVR consists of a computer and special video management software. It is a true digital system that records the digital images or videos received over the network onto a hard disk or another storage device. So you could view, playback, and download recordings when needed. Usually based on Windows or Linux environments, a NVR usually has a user friendly graphical user interface, flexible recording, playback capability, intelligent motion detection and camera control capability. Remote access is also available with NVR, and other benefits include ease of installation and usage, the capability of handling large amounts of video streams. There are a few configuration options for NVR setup, among which the setup with network switch such as PoE switch is gaining increasing recognition.
Unlike standard network switch, a PoE switch is capable of delivering data and power simultaneously through an Ethernet cable. This type of switch will act as a hub but can also supply power to POE compatible devices such as IP security cameras, without the need for an external power source or extra power wires. This makes for less installation cost and cabling complexity – you can handle your power and video over a single CAT5 cable. Here we use FS 8-port PoE switch as an example to show how to connect your NVR to a PoE switch, just perform the following steps:
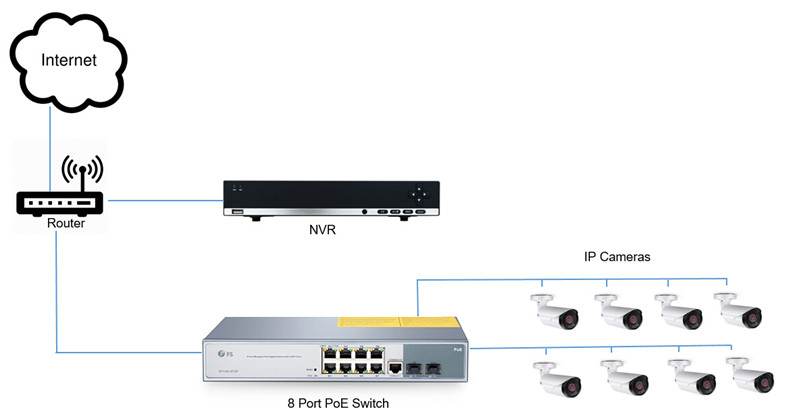
- Connect an Ethernet cable from the LAN port on the PoE switch to your router. Connect the power cable to the PoE switch to a power outlet.
- Connect IP cameras to ports #1 – #8 on the PoE switch using the Ethernet cables. The PoE switch will provide power and video transmission the same way your NVR does.
- You must add the cameras to your NVR to view the cameras and enable recording. To do this, follow the steps in your NVR’s instruction manual.
It happens sometimes that you want to add more ports to the network, but cannot justify the price to replace a higher-density switch. Here we offer you a cost-effective solution by leveraging some network components at hand: a modem/router combo – the connection between your internal devices and the outside (Internet), and a hub.
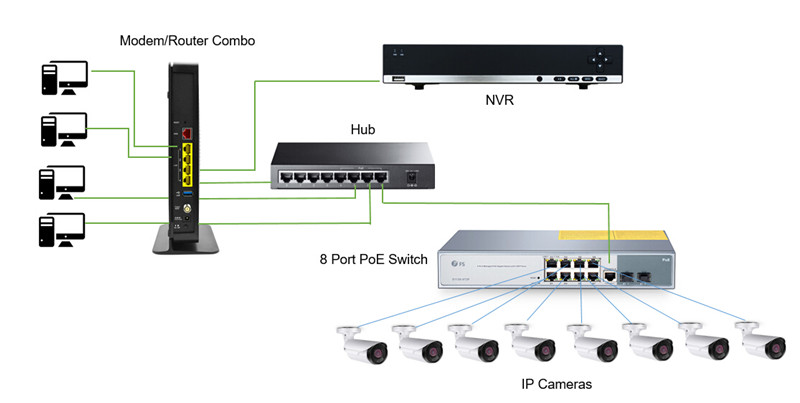
- Run a CAT5 cable (shown in blue) to connect your cameras to the ports of a PoE switch. The POE switch will act as a HUB to connect them to the local network.
- Connect a 8-port hub to your router, then link the PoE switch with an open port on the hub. In this way, the other 7 ports are available for adding more devices.
- Plug your NVR into an open port on your router. Now your cameras and your NVR are all on the same network. With some minor configuration (port forwarding), you can access your NVR remotely since it is plugged into your modem/router.
NVR / IP camera setup necessitates the use of an external PoE switch to simplify or extend the wiring of your installation. Sometimes, a router and a hub are required to get extra port to expand your system. Ever confused by PoE switch connectivity issues? Don’t hesitate to connect FS.COM via sales@fs.com to find more solutions!
Related articles:
Buy PoE Switch: Five Aspects to Consider
Extend Your Network With PoE Switch