Tag Archives: CFP module

40 Gigabit Ethernet Options Guideline

Share

When the IEEE introduced the 802.3ba Ethernet standard, this was in response to the increasing bandwidth demands facing data centers, paving the way for the introduction of 40Gb/s and 100Gb/s Ethernet operations. Believe it or not, the 40 Gigabit Ethernet era is already upon us. This text put together a brief overview of the current 40 Gigabit Ethernet optics types and form factors to aid in planning for future high-performance Ethernet needs.

40 Gigabit Ethernet Standards
The IEEE 802.3ba introduced the 40 Gigabit and 100 Gigabit Ethernet standards in 2010. 802.3ba is the designation given to the higher speed Ethernet task force which completed its work to modify the 802.3 standard to support speeds higher than 10 Gbit/s. This was the first time two different Ethernet speeds were specified in a single standard. The table below gives detailed specifications for 40 Gigabit Ethernet standards.

40 Gigabit Ethernet qsfp

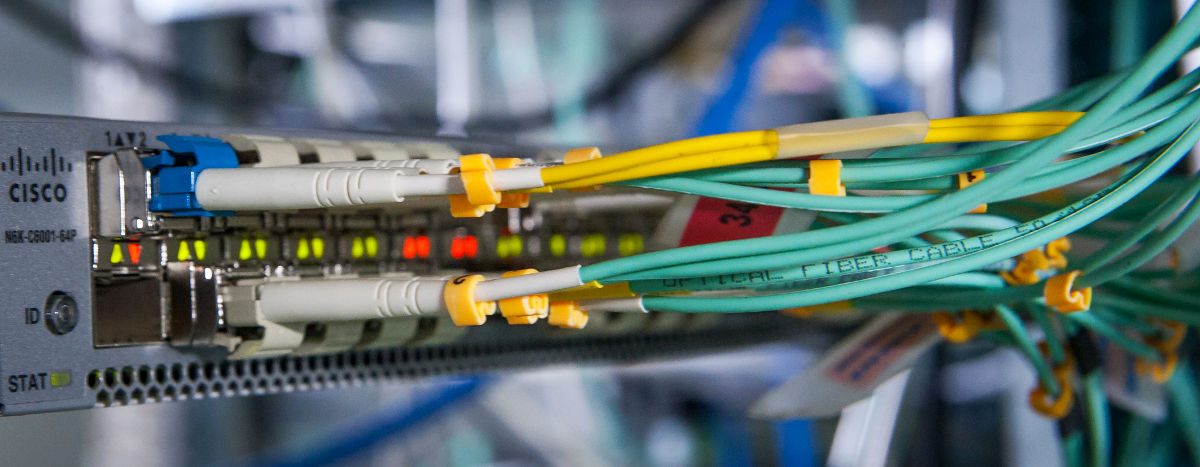
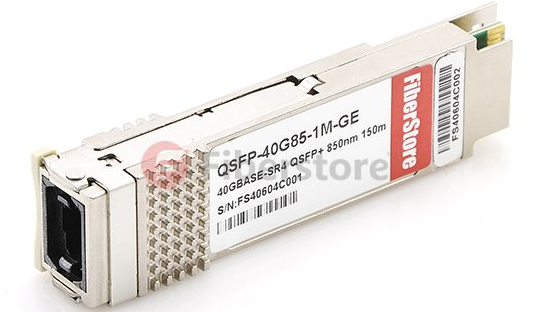
40 Gigabit Ethernet QSFPTransceiver Options
As with any new generation of technology, one design goal was to leverage as much existing technology as possible. By minimizing the number of new interfaces, the interfaces become less expensive and take advantage of volume production and simplicity. To meet this design goal, there are three media modules will be used in the first generation of 40 Gigabit Ethernet: QSFP, CXP and CFP.

  • QSFP
    The Quad Small-Form-Factor Pluggable (QSFP) is similar in size to the CXP and provides four transmit and four receive lanes to support 40 Gigabit Ethernet applications for multimode fiber and copper today and may serve single-mode in the future. Another future role for the QSFP may be to serve 100 Gigabit Ethernet when lane rates increase to 25 Gbps.
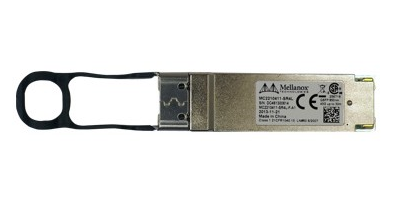
QSFP

  • CXP
    The CXP transceiver features 12 transmit and 12 receive 10-Gbps lanes to support one 100 Gigabit Ethernet port, or up to three 40 Gigabit Ethernet ports. It can achieve rates up to 120 Gbps of pluggable data over 12 lanes in one assembly while enhanced-footprint connectors transmit signals over 10 lanes for up to 100 Gbps.
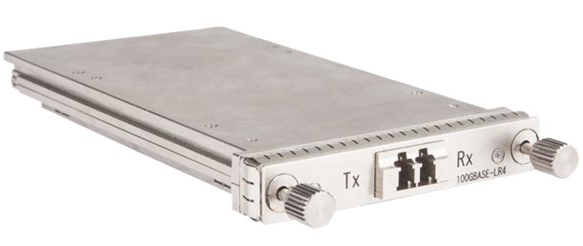
CXP

  • CFP
    The C Form-Factor Pluggable (CFP) is a new media module that was designed for longer-reach applications, with up to 24 watts of power dissipation. Its dense electrical connectors and integrated, riding heat sink enable a range of interfaces. This module is used for 40GBASE-SR4, 40GBASE-LR4.

CFP

40GbE Cabling Options

The most common 40GbE cable is the QSFP+ Cable. Such as QSFP direct attach copper cable (DAC) and QSFP active optical cable (AOC). Besides, the MPO/MTP cable is considered the best solution for 40GbE. Since MPO/MTP connectors have either 12 fibres or 24 fibres array, which can allow data transmission across multiple fibres simultaneously.

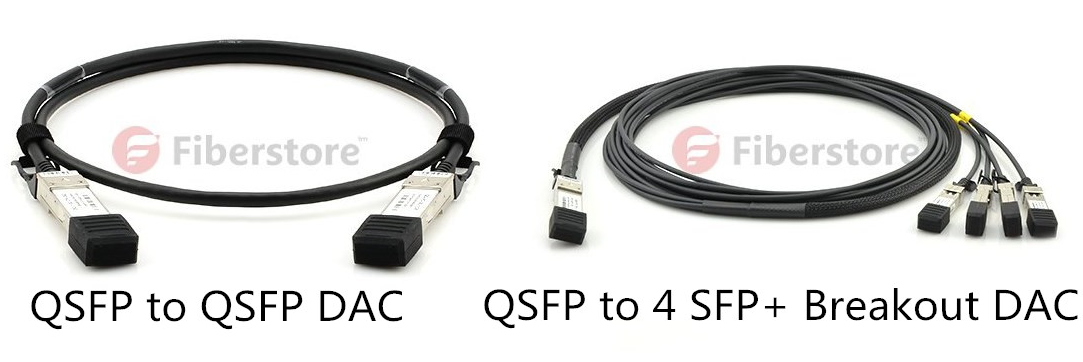
  • Direct Attach Copper Cable

Transmitting 40 GbE over short distances of parallel coaxial copper cabling (also referred to as twinax cabling) is accomplished using a special cabling assembly with four lanes of coaxial cabling (eight pairs). Four pairs each transmit 10 Gbps in one direction and four transmit 10 Gbps in the other direction for a total data rate of 40 Gbps. The two common DACs used in 40g Ethernet are QSFP to QSFP and QSFP to 4 SFP+ copper direct-attach cables.

40G DAC

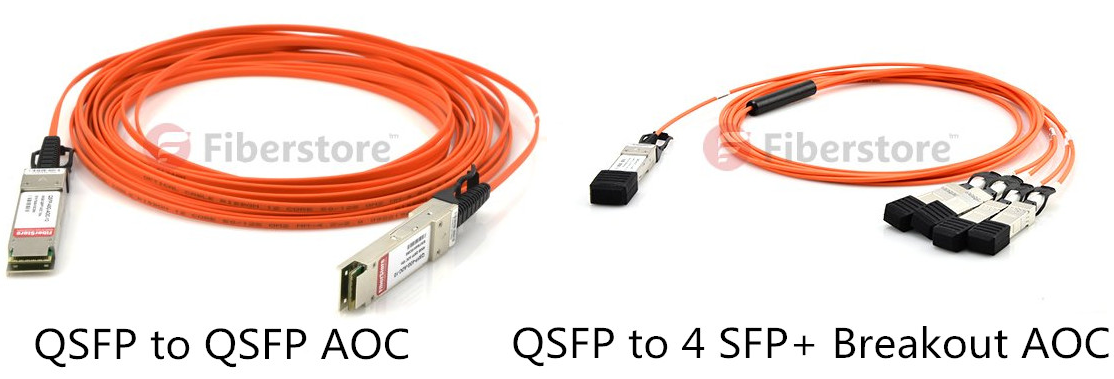
  • Active Optical Cable

In the market, there are two common 40g fiber cable: QSFP to 4 SFP+ breakout AOC and QSFP to QSFP AOC. The former is a 4×10 Gb/s parallel active optical cable which transmits four separate streams of 10 Gb/s data over ribbon cables in a point-to-multipoint configuration. The cable contains a QSFP+ module on one end and four separate SFP+ modules at the other ends. The latter is a 40 Gb/s parallel active optical cable which transmits error-free parallel 4×10 Gb/s data over multimode fiber (MMF) ribbon cables.

40G AOC

  • MPO/MTP Cable

Current multi-mode optics standards for 40GbE optics use multiple 10Gbps lasers, simultaneously transmitting across multiple fiber strands to achieve high data rates. Because of the multi-lane nature of these optics, 40GbE multi-mode optics use a different style of fiber cabling, known as MPO or MTP cabling. As with 10GbE optics over multi-mode fiber, an OM3 or OM4 grade MMF is needed to be able to cover longer distances. For 40g Ethernet, we can use 8 fibers MPO/MTP harness cables or 12 fibers MPO/MTP trunk cables. The former is to directly connect a QSFP port to other 4 SFP+ ports. The latter is to directly connect one QSFP port to another QSFP port.

MPO/MTP cable

Related articles:

40G Network Connectivity Solutions
MTP Fiber Cable Solutions
Three Types MTP Harness Cables Used in Today’s Data Center

A Complete Guide of Installing or Removing Transceiver Modules (Part III)

Share

Monday again, welcome to my blog. This week, we are going to finish the topic “A Complete Guide of Installing or Removing Transceiver Modules”. As we know, we continue this topic for almost three weeks, and today, we will explain the Part III, ie. the last part. The Part III is explaining mainly the installation and remove of QSFP/QSFP+ and CFP.

After learning the Part I and Part II, you may have a better understanding of installing or removing transceiver modules, such as SFP, X2, GBIC, XENPAK or XFP etc. You may also find that the different transceivers are similar in the installing or removing steps. Nonetheless, there is unique feature of different transceiver modules which affect the installing and removing, so that we should be carefully and understand each type of transceiver. OK, now we are return to today’s main topic – How to Install or Remove the QSFP/QSFP+ and CFP.

How to Install or Remove QSFP/QSFP+ Transceiver Module

QSFP/QSFP+ Installing Steps
step 1: Attach an ESD wrist strap to yourself and a properly grounded point on the chassis or the rack.
step 2: Remove the QSFP+ transceiver module from its protective packaging.
step 3: Check the label on the QSFP+ transceiver module body to verify that you have the correct model for your network.
step 4: For optical QSFP+ transceivers, remove the optical bore dust plug and set it aside.
step 5: For transceivers equipped with a bail-clasp latch:
a. Keep the bail-clasp aligned in a vertical position.
b. Align the QSFP+ transceiver in front of the module’s transceiver socket opening and carefully slide the QSFP+ transceiver into the socket until the transceiver makes contact with the socket electrical connector.

step 6: For QSFP+ transceivers equipped with a pull-tab:
a. Hold the transceiver so that the identifier label is on the top.
b. Align the QSFP+ transceiver in front of the module’s transceiver socket opening and carefully slide the QSFP+ transceiver into the socket until the transceiver makes contact with the socket electrical connector.

step 7: Press firmly on the front of the QSFP+ transceiver with your thumb to fully seat the transceiver in the module’s transceiver socket.
Please Note: If the latch is not fully engaged, you might accidentally disconnect the QSFP+ transceiver module.

step 8: For optical QSFP+ modules, reinstall the dust plug into the QSFP+ transceivers optical bore until you are ready to attach the network interface cable. Please Note: Do not remove the dust plug until you are ready to attach the network interface cable.

QSFP/QSFP+ Removing Steps
step 1: For optical QSFP+ transceivers, disconnect the network interface cable from the QSFP+ transceiver connector.
step 2: For QSFP+ transceivers equipped with a bail-clasp latch.
a. Pivot the bail-clasp down to the horizontal position.
b. Immediately install the dust plug into the transceivers optical bore.
c. Grasp the sides of the QSFP+ transceiver and slide it out of the module socket.

step 3: For QSFP+ transceivers equipped with a pull tab latch
a. Immediately install the dust plug into the transceiver’s optical bore.
b. Grasp the tab and gently pull to release the transceiver from the socket.
c. Slide the transceiver out of the socket.

step 4: Place the QSFP+ transceiver into an antistatic bag.

How to Install or Remove CFP Transceiver Module

CFP Installing Steps
step 1: Remove the CFP transceiver from its protective packaging.
step 2: Check the label on the CFP transceiver body to verify that you have the correct model for your network.
step 3: Remove the dust plug from the CFP transceiver module optical port and set it aside.
step 4: Align the CFP device into the transceiver port socket of your networking module, and slide it in until the CFP transceiver EMI gasket flange makes contact with the module faceplate.
step 5: Press firmly on the front of the CFP transceiver with your thumb to fully seat it in the transceiver socket.
step 6: Gently tighten the two captive installation screws on the transceiver to secure the CFP transceiver in the socket.
step 7: Reinstall the dust plug into the CFP transceiver’s optical bore until you are ready to attach the network interface cable.
step 8: When you are ready to attach the network cable interface, remove the dust plugs and inspect and clean fiber connector end faces, and then immediately attach the network interface cable connectors into the CFP transceiver optical bores.

CFP Removing Steps
step 1: Disconnect the network fiber-optic cable from the CFP transceiver connectors. Immediately reinstall the dust plugs in the CFP transceiver optical bores.
step 2: Loosen the two captive installation screws that secure the CFP to the networking module.
step 3: Slide the CFP transceiver out of the module socket. Immediately place the CFP transceiver in antistatic protective packaging.

Author’s Note
Up to here, the topic “A Complete Guide of Installing or Removing Transceiver Modules” has already finished. Thanks all the reader for continued focusing. In fact, the installing or removing steps of the mentioned transceiver modules are the general case. Different transceiver modules of different brands have their own features. We should ask the vendor to get more informations when you face a problem that we do not mentioned here. In addition, to save more money, we suggest that compatible 3rd transceiver modules may be another good choice but you should ensure that your vendor is reliable. Fiberstore‘s fiber optic transceivers are 100% compatible with major brands like Cisco, HP, Juniper, Nortel, Force10, D-link, 3Com. They are backed by a lifetime warranty so that you can buy with confidence. Additionally, customize optical transceivers to fit your specific requirements are available. If you have any requirement of transceivers, Fiberstore will be a good choice for you.

Article Source: http://www.fiber-optic-transceiver-module.com/a-complete-guide-of-installing-or-removing-transceiver-modules-part-iii.html

The Chanllenges of Technology And Cost 100G Faced

Share

More and more high bandwidth services such as high definition(HD) video, online games and video conference challenging the traditional network, 100G as a ease network bandwidth technology, becomes the new hope of the operator.

100G industry chain has matured, with all components and subsystems have commercial capacity of multiple manufacturers, the market also needs the support of 100G system, the backbone network will be fully transferred to the 100G-leading era. From the early 2013, the focus point of 100G is from the laboratory into 100G network deployment and the commercial 100G has started.

Four Technical Challenges Of 100G

Although the 100G has been carried out, but the 100G transmission technology meets four technical challenges.

First, high power consumption. The achievement mechanism of 100G technology is complex, the optical receiver requires the use of coherent reception and processing of the DSP, the key chip has no ASIC, resulting in high power consumption of the whole 100G system. When large-scale commercial 100G technology, the average power consumption of each wavelength is still a problem waiting to be solved. Currently the power consumption of per wavelength is above 200W, the average power consumption of per frame is 7000W, so there will need three frames. Obviously, the 28nm process can help to reduce energy consumption, but there is no 100G solution of 28-nanometer. In addition, although the light energy consumption is not large, but due to the use of next-generation optical transceiver will increase greatly, reducing the power consumption is very necessary.

The second is integrated, especially in the field of optical circuit and photoelectric integration. How to add mass active and passive optical devices such as laser, optical amplifier, wavelength division multiplexing(WDM) and transmitter/receiver to the network to achieve highly integrated? Using semiconductor technology to the integration of CWDM and laser?

The third is test. The challenges of 100G testing include the quality evaluation of the deployed 100G system signal and the system maintenance after deployed. 100G using polarization multiplexing, and the signal spectrum is wide, the common OSDR and test instruments can not real-time test it, only by shutting off the laser method. How to achieve real-time test is industry’s future research topic, many of today’s online testing system are worth studying.

The Fourth is few prospective studies. How to make the current transmission system gradually shift to user-oriented management from the traditional network management? Quickly and efficiently allocate the physical resources?

The key is the problem of cost

The key reason why 100G failed to be applied large-scale currently is the opportunity cost is relatively too high. In the era of 100G, the cost of optical module is very high. The mainstream CFP module, the actual sales price is more than $10,000. From the point of optical module cost, 100G module is several times higher than 10G optical module. It also requires manufacturers continue to make efforts in chip integration, integrated optical module miniaturization and system design, to achieve the overall cost of products are reduced.

Especially the regard of optical module technology, the cost of this part is the key of the whole 100G system cost, the optical module itself has to face the challenges of control power consumption and improve board integration.